Is it possible to start a blog in Kenya and start earning money with it?
Yes. It is possible to start a blog in Kenya and start making money from it even as a beginner. But how do you get started? What are the dos and don’ts when starting a money-making blog in Kenya?
To start a blog in Kenya, you will require a domain name, a good hosting service, and profitable niche content. To start making money with your blog in Kenya, you will have to monetize using services such as Google AdSense, Ezoic or through affiliate marketing. This post has covered everything you need with a step-by-step guide on how to start your blog.
Steps on How to Start a blog in Kenya
Step 1: Choose a Blog Topic(Niche)
Your area of interest in blogging is referred to as a niche. It is what your blog will revolve around.
When choosing your blogging, consider what you are passionate about, your hobbies, or what excites you. Don’t be tempted to write everything you know; concentrate on that topic you are an expert on.
Examples of some profitable blogging niches
- Write a fashion blog that will keep people updated with all the latest fashion trends.
- You can start a travel blog that will attract audiences who love adventures, especially tourists.
- You can start a work-from-home blog for stay-at-home moms and college students.
- You can start a personal finance blog that helps people manage their money wisely to become financially secure.
- You can start a product reviews blog which you can easily monetize through affiliate marketing.
There are many other blog niches that you can write about depending on your expertise and what you are passionate about. It would be best if you brainstormed a little and convert your idea into income.
Step 2: Choose your Domain Name
After deciding on the topic, you want to blog about. You have to choose a blog name that will give your audience a clear picture of what your blog stands for and what they can expect from it.
Sometimes choosing a domain name is not easy. However, you can be creative a little bit. For example, if your blog is about travel & tourism and your name is Joyce, your domain may be joycemtalii.com or joycetravels.com.
I always buy my domain names from Namecheap as they’re relatively cheap. Mostly the domains are discounted especially for new buyers and the annual renewal fee is fair.
You can try checking if your domain is available. Otherwise, you can check it later while setting up your hosting account as described later in this post.
Tips to consider when choosing a domain name
- A domain name should be short and easy to remember.
- Avoid using numbers, dashes, or any other symbol as you will be confusing your readers. Letters only will do just fine.
- Always use a .com domain extension. Avoid using other extension such .net, .info, etc. As you may have noticed, my domain name has a “.co.ke” extension because most of my posts target readers from Kenya and the neighboring regions.
Step 3: Hosting your blog online
When it comes to hosting your blog, avoid using free hosting platforms such as WordPress.com or Blogger; if you want to make money with your blog in Kenya.
You will require a blogging tool and a web hosting company to publish your blog online. A good example of a blogging tool is WordPress software which is free and is easy to install once you purchase your hosting service.
There are many relatively cheap Web-Hosting companies at your disposal, such as Bluehost, HostGator, Namecheap, etc. They are available worldwide; hence you can use them to start a blog in Kenya. Bluehost is one of the popular hosting services, especially for beginners, and I highly recommend it.
Why you should use Bluehost to host your blog
Bluehost has outstanding 24/7 technical support. As a beginner, you will probably be stuck or even make a typical mistake. Bluehost customer service is always ready to help you.
Bluehost offers a free domain name which will save you about $13 (KES 1300).
In terms of costs, Bluehost is cost-effective since you will get a 63% discount and only pay $3.95 instead of $7.99/month for the basic plan.
You will also get a 1-click WordPress blogging tool installation. WordPress will help you write your posts, edit appearance; I have discussed it later in this post.
Bluehost offers you a free SSL certificate. An SSL secures by adding an ‘s’ to your URL. Instead of it being http://, it will be https://
Getting started with Bluehost
I am sure you are already familiar with the benefit accrued with using Bluehost as your hosting service. If you already have another hosting service that you prefer, skip this step and scroll down to the next step.
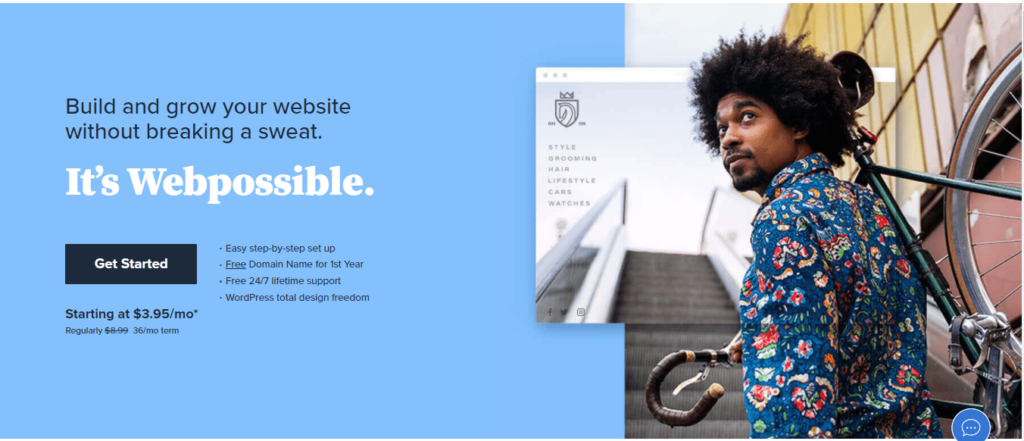
Click ‘Get Started’ button as shown below
Select your web hosting plan
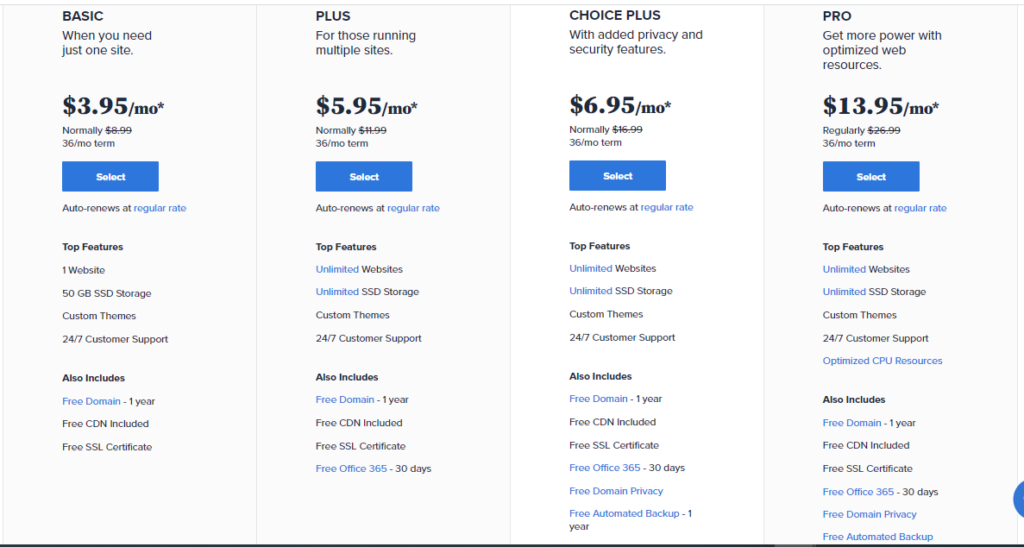
There is no need to choose an expensive plan and purchase tools that you won’t use as a beginner. I recommend you select the basic plan, which is cheaper, and then click Next.
Register your domain name
As I explained in step 2 above, you must have a unique domain to brand your blog.
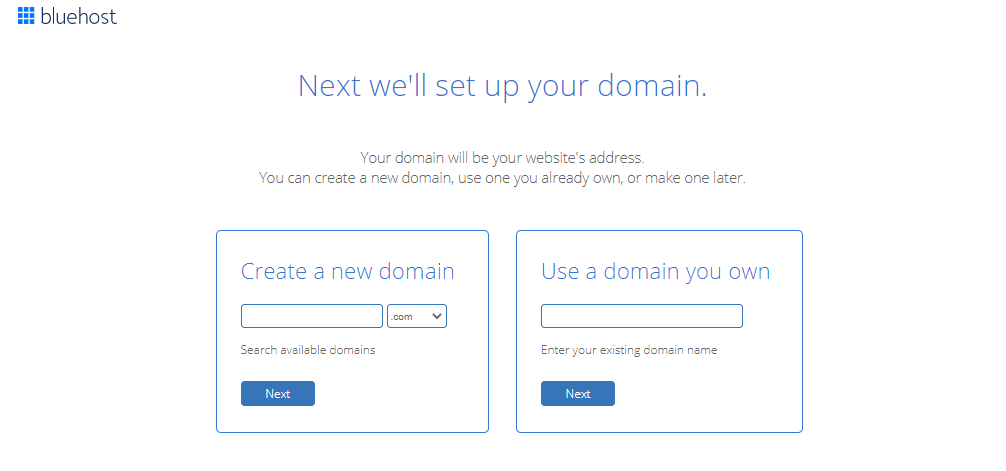
Under create your domain section, type your domain name and check whether it is available. Keep on changing it, but don’t get out of your niche until you an available one. Ensure you use the .com extension unless you have a very good reason not to.
Note: If you already own a domain, enter it on the ‘Use a Domain You Own’ section.
Enter your Account information
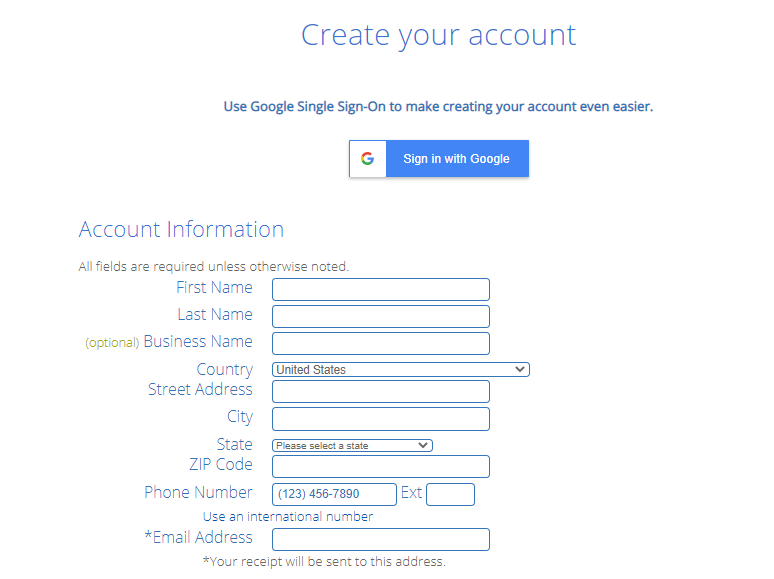
You must fill the fields, which include your name, country, email address, etc.
You can also sign up with Google, which will ease the account setup.
Edit your Package Information

The duration of your hosting plan is billed after either 12, 24, or 36 months. A high duration will get you the highest monthly discounted. The 12-months plan is also relatively discounted and affordable. Being a beginner, you can start with the 12-months plan, but if you can afford the 36-months plan, go ahead and buy it.
Under the Package Extras, you should uncheck all the extras such as Codeguard Basic, increasing your order price. You don’t need these extras, and if you need them later, you can always add them.
Under the Payment Information, enter your Credit Card details and proceed to payment. You can also use PayPal to pay by clicking ‘see more payment options.’
After paying, check your email inbox for login details and sign into your Bluehost account.
Step 4: Install a Blog Theme/Template
After completing step 4, your account will be set up, and Bluehost will automatically install the WordPress blogging tool after clicking on the WordPress icon.
It would help if you now changed the appearance of your blog by customizing it. To do this, you require a theme. WordPress has a lot of free themes which you can choose from, such as Astra, OceanWP.
To change your theme, go to Appearance, Themes, and then select the one you like and click ‘Install’ (If you cannot find the theme template you want, click ‘Add New’ and then install it). As soon as your theme is installed, click ‘Activate.’
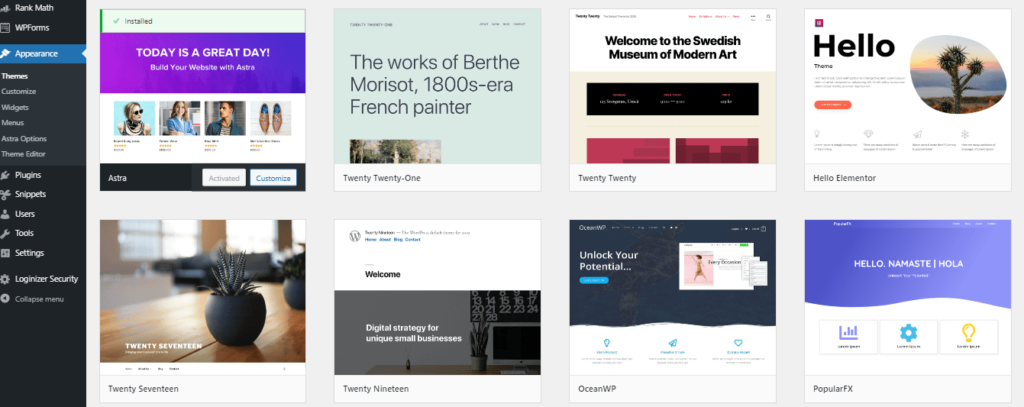
I like the Astra theme; they have both free and premium themes. If you are on a tight budget, I recommend you start with the free one; it has great features and is also easy to use.
After installing your theme, go to Appearance on the left sidebar and click customize. Here you will be able to edit your theme while previewing it as it will be after it is online.
Dos and Don’ts after WordPress Installation
It is usual for new bloggers to be excited to publish their new blog posts. Before you do so, there are some things you might consider doing to avoid committing serious mistakes that might cost you later.
Changing your permalink structure
How your links look might affect your posts ranking on search engines. To change the permalinks structure: On the left sidebar, click Settings and then Permalinks. Select Post name and click save changes.
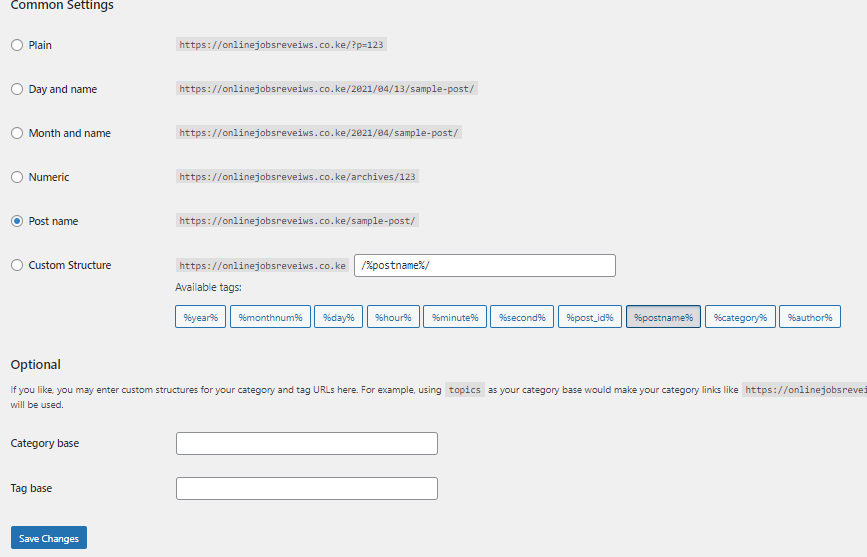
Change your WordPress username.
The default WordPress username is ‘admin,’ which hackers can take advantage of and hack your site. You, therefore, should change it to another unique username. Although WordPress doesn’t allow change of usernames, below I have given a simple procedure of you can do it:
- On the left sidebar, Go to Users, click All Users and then Add New
- Fill in your information, including a strong password of at least 12 characters.
- Select ‘Administrator’ for the role and save your changes.
- Log out of WordPress and then log back in with your username and password you just created.
- Head back to Users and click All Users.
- Delete the old ‘Admin’ username and then attribute all posts and links to the new username and then click confirm.
Set a backup for your site. You can do this by installing a backup plugin such as Updraft, by clicking on the Plugins, and then Add New, Install and Activate. If you are using Bluehost, they will automatically backup your site, so you shouldn’t worry.
Avoid installing a lot of plugins. You should install great plugins, such as Akismet antispam plugin, which blocks spam comments. However, installing many plugins will slow your site, which will affect your SEO.
Avoid writing a short post. Search engines such as Google tend to rank longer posts on the first pages. Therefore, you should consider a longer post, especially if your niche has high competition.
Step 5: Start writing blog Posts
With your new blog, you have to create content that will focus on solving your readers’ problems. Take your time and write content that people will love reading and even share with others. Your content should make people want to keep coming back to your blog, not chase them away.
The importance of choosing a blog niche that you are passionate about; is you won’t have to struggle while creating your content. There are many different ways of creating your blog content.
Writing articles that have been ‘overdone’ will lead to poor ranking on search engines. Before you write any post, you should first do keyword research. Keyword research will give you the search terms with high volume and at the same low competition. Let your posts be based on these search tags to rank faster on search engines. If your blog is targeting local traffic in Kenya, keyword research is not much important. It is very simple to rank on most Kenyan niches and get enough traffic to your blog.
Step 6: Monetizing your blog in Kenya
The goal is to guide you on how you can start a money-making blog in Kenya.
As a beginner, there is no need to rush into monetizing your blog. I will be honest completely honest with you. Before you start seeing real earnings from your blog, you have to churn great content in your first few months.
Therefore, I would recommend you focus more on creating amazing and helpful content that will attract more readers and help you get sufficient web traffic. Your blog will generate low income without good quantity and quality traffic since your traffic is more interested in your blog content. Concentrating on creating relevant content will bear you more fruits.
You can start monetizing your blog anytime you wish, provided you have quality traffic even with fewer posts. Someone might have a blog with 20 posts but still have more traffic than another person with 50 posts on the same niche.
Ways to monetize your blog and earn passive income in Kenya
1. Google AdSense
Google AdSense is popular with new bloggers since they don’t have a lot of requirements. Once you apply and get approved by Google AdSense, they will start showing ads on your blog.
Your earnings will be per 1000 views on your blog. The earnings vary depending on your niche, demographic and geographic location of your traffic.
Getting approved by Google AdSense is very easy. However, if your blog doesn’t meet their requirements, your application will be rejected.
How to get your blog approved by AdSense faster in Kenya
Ensure you have a privacy policy page, an about page, and a disclaimer page if you share affiliate links in your blog.
Write original content which has not been overdone. Avoid copying content from other sites and posting it on your blog. AdSense will not approve your blog if you have plagiarized other sites’ content.
Have sufficient posts and traffic. I had 15 posts and around 8,000 views by the time AdSense approved my blog. Some people might be approved with fewer posts and others with more posts than mine. If you already have 20+ posts, you may apply for AdSense.
Avoid writing short posts. Depending on your niche, your post should have 1000+ words. For some sites like news blogs, you can write less than 1000 words and still do well.
Have at least 50% search engine traffic. The social media traffic is easier to get, but it is not the best when using AdSense. And that is the reason you must understand Search Engine Optimization (SEO). SEO helps you write articles that will rank on the first pages on google.
Apart from Google AdSense, there are other ad services that you can use to monetize your blog, such as Ezoic or Mediavine. They, however, have a lot of requirements that your site must meet before being approved.
2. Affiliate Marketing
With affiliate marketing, you will promote other people’s products. For every successful sale you make, you will earn a commission.
Your blogging niche will have a bigger influence on the type of products you will promote using Kenya’s affiliate marketing. The products promoted must meet the needs of your readers, who are the potential buyers.
If a higher percentage of your blog is from Kenya, you should consider promoting products from local e-commerce sites such as Jumia.
On the other hand, if you have high traffic from Europe and North America regions, you can apply for international affiliate marketing programs such as Amazon, CJ affiliate, etc.
3. Sell your products using your blog
Digital products such as eBooks, online courses, membership sites are the simplest to sell and generate high income. If you already have one, then nothing can stop you from earning.
The main advantage of having a digital product is that you can start making money even with less than 1000 visitors. With just a few amazing articles on your blog, quality traffic interested in your posts, and your unique and desirable digital product, you can generate enough income from your blog.
One way of getting people to buy your products is by giving them free samples to see what your products contain. If someone uses your product and loves it, they will not hesitate to buy your other products.
To widen your market, you can create products that will attract buyers from any country. It will increase your sales and also help you get more traffic from other regions.
4. Offer your freelance services
Perhaps you have a special skill that you can offer online, but you find it hard to get clients.
Write a ‘Hire Me Page’ where you will clearly explain the services you offer. Some of the best freelancing services are online writing, graphic design, web development, transcribing, etc.
It will be more advantageous if your blog niche is based on your freelancing skills. For example, if a client wants an article writer on a work-from-home niche, he will consider someone with a blog under the same niche.
Get Started Now
You have already learned how you can start a money-making blog in Kenya and start earning passive income. The only way you can create a money-making blog with your blog is by getting started today and learn day by day. If you are stuck anywhere, you can always contact us.